


Assalamu'alaikum.wr.wb.
Disini saya akan posting laporan yang saya buat mengenai materi Lab 2.1 Security Router (Firewall) Chain Input dengan 2 metode di MikroTik
Here I will post my report on lesson the matter Lab 2.1 Security Router (Firewall) Chain Input with 2 Methods in MikroTik.

A. Tujuan
A. Purpose
- Dapat mengetahui penjelasan Chain Firewall beserta jenisnya di Mikrotik.
A. Purpose
- Dapat mengetahui penjelasan Chain Firewall beserta jenisnya di Mikrotik.
- Dapat mengetahui jenis Action di MikroTik.
- Dapat mengetahui teknik firewall di MikroTik.
- Dapat mengetahui cara konfigurasi Security Router (Firewall) Chain Input dengan 2 metode.
- To knows explanation Chain Firewall along kind in Mikrotik.
- To know Action in MikroTik.
- To know firewall techniques in MikroTik.
- To know how to configure Security Router (Firewall) Chain Input with 2 methods.
B. Perlengkapan
B. Materials
3 Jenis chain di MikroTik:
3 type chain in MikroTik:
A. Input
Digunakan untuk memproses paket memasuki router melalui salah satu interface dengan alamat IP tujuan yang merupakan salah satu alamat router. Chain input berguna untuk membatasi akses konfigurasi terhadap Router Mikrotik.
A. Input
Used to process packets entering the router through one interface with an IP address of the destination which is one of the router's address. Chain input allows you to restrict access to Mikrotik Router configuration.
B. Forward
Digunakan untuk proses paket data yang melewati router.
B. Forward
Used to process the data packets passing through the router.
C. Output
Digunakan untuk proses paket data yang berasal dari router dan meninggalkan melalui salah satu interface.
C. Output
Used to process the data packets coming from the router and leave through one interface.
2. Action
Terdapat beberapa jenis Action pada konfigurasi firewall, yaitu:
There are several types of Action on the firewall configuration, namely:
A. Accept
Paket diterima dan tidak melanjutkan membaca baris berikutnya.
A. Accept
Package received and not continue to read the next line.
B. Drop
Menolak paket secara diam-diam (tidak mengirimkan pesan penolakan ICMP).
B. Drop
Refused package secretly (not sending ICMP messages rejection).
C. Reject
Menolak paket dan mengirimkan pesan penolakan ICMP.
C. Reject
Reject the packet and send an ICMP message rejection.
D. Jump
Melompat ke chain lain yang ditentukan oleh nilai parameter jump-target.
D. Jump
Jump to another chain that is determined by the value of the parameter jump-targets.
E. Tarpit
Menolak, tetapi tetap menjaga TCP connection yang masuk (membalas dengan SYN/ACK untuk paket TCP SYN yang masuk).
E. Tarpit
Refused, but keep the incoming TCP connection (reply with a SYN / ACK for incoming TCP SYN packets).
F. Passthrough
Mengabaikan rule ini dan menuju ke rule selanjutnya.
F. Passthrough
Ignoring this rule and go to the next rule.
G. Log
Menambahkan informasi paket data ke log.
G. Logs
Adding information to the log data packets.
3. Teknik Firewall
3. Techniques Firewall
Terdapat 2 teknik yang digunakan, yaitu:
There are two techniques used, namely:
A. Drop some, accept all
Firewall menolak/membuang beberapa paket yang diinginkan dan tidak dibutuhkan kemudian menerima/mengizinkan semua paket.
A. Drop some, accept all
Firewall rejects/discard some desired package and not needed then accept/allow all packets.
B. Accept some, drop all
Firewall mengizinkan/menerima beberapa paket yang diinginkan dan dibutuhkan kemudian menolak/membuang semua paket.
B. Accept some, drop all
Firewalls allow/accept some packages they want and need then reject/discard all packets.
D. Langkah-langkah
D. Steps
Non-aktifkan LAN dan Wireless Network Connection di Control Panel>Network and Internet>Network Connections pada PC/Laptop.
Disable LAN and Wireless Network Connection in the Control Panel->Network and Internet-> Network Connections on your PC/Notebook.
- Dapat mengetahui teknik firewall di MikroTik.
- Dapat mengetahui cara konfigurasi Security Router (Firewall) Chain Input dengan 2 metode.
- To knows explanation Chain Firewall along kind in Mikrotik.
- To know Action in MikroTik.
- To know firewall techniques in MikroTik.
- To know how to configure Security Router (Firewall) Chain Input with 2 methods.
B. Perlengkapan
B. Materials
- 1 Unit PC/Laptop
- VirtualBox
- ISO MikroTik
- WinBox
- Nmap
- Nmap
- 1 Unit PC/Notebook
- VirtualBox
- ISO MikroTik
- WinBox
- Nmap
C. Konsep Dasar
C. Basic Concepts
1. Chain Firewall
Firewall beroperasi dengan menggunakan aturan firewall. Setiap aturan terdiri dari dua bagian matcher yang sesuai arus lalu lintas terhadap kondisi yang diberikan dan tindakan yang mendefinisikan apa yang harus dilakukan dengan paket yang cocok. Aturan firewall filtering dikelompokkan bersama dalam chain. Hal ini memungkinkan paket yang akan dicocokkan terhadap satu kriteria umum dalam satu chain, dan kemudian melewati untuk pengolahan terhadap beberapa kriteria umum lainnya untuk chain yang lain.
Firewall operates by using firewall rules. Each rule consists of two parts matcher corresponding traffic flow for the given conditions and actions define what should be done with the right plan. Filtering firewall rules are grouped together in a chain. This allows packets to be matched against one common criterion in one chain, and then passed over for processing against some other common criteria to another chain.
3 Jenis chain di MikroTik:
3 type chain in MikroTik:
A. Input
Digunakan untuk memproses paket memasuki router melalui salah satu interface dengan alamat IP tujuan yang merupakan salah satu alamat router. Chain input berguna untuk membatasi akses konfigurasi terhadap Router Mikrotik.
A. Input
Used to process packets entering the router through one interface with an IP address of the destination which is one of the router's address. Chain input allows you to restrict access to Mikrotik Router configuration.
B. Forward
Digunakan untuk proses paket data yang melewati router.
B. Forward
Used to process the data packets passing through the router.
C. Output
Digunakan untuk proses paket data yang berasal dari router dan meninggalkan melalui salah satu interface.
C. Output
Used to process the data packets coming from the router and leave through one interface.
2. Action
Terdapat beberapa jenis Action pada konfigurasi firewall, yaitu:
There are several types of Action on the firewall configuration, namely:
A. Accept
Paket diterima dan tidak melanjutkan membaca baris berikutnya.
A. Accept
Package received and not continue to read the next line.
B. Drop
Menolak paket secara diam-diam (tidak mengirimkan pesan penolakan ICMP).
B. Drop
Refused package secretly (not sending ICMP messages rejection).
C. Reject
Menolak paket dan mengirimkan pesan penolakan ICMP.
C. Reject
Reject the packet and send an ICMP message rejection.
D. Jump
Melompat ke chain lain yang ditentukan oleh nilai parameter jump-target.
D. Jump
Jump to another chain that is determined by the value of the parameter jump-targets.
E. Tarpit
Menolak, tetapi tetap menjaga TCP connection yang masuk (membalas dengan SYN/ACK untuk paket TCP SYN yang masuk).
E. Tarpit
Refused, but keep the incoming TCP connection (reply with a SYN / ACK for incoming TCP SYN packets).
F. Passthrough
Mengabaikan rule ini dan menuju ke rule selanjutnya.
F. Passthrough
Ignoring this rule and go to the next rule.
G. Log
Menambahkan informasi paket data ke log.
G. Logs
Adding information to the log data packets.
3. Teknik Firewall
3. Techniques Firewall
Terdapat 2 teknik yang digunakan, yaitu:
There are two techniques used, namely:
A. Drop some, accept all
Firewall menolak/membuang beberapa paket yang diinginkan dan tidak dibutuhkan kemudian menerima/mengizinkan semua paket.
A. Drop some, accept all
Firewall rejects/discard some desired package and not needed then accept/allow all packets.
B. Accept some, drop all
Firewall mengizinkan/menerima beberapa paket yang diinginkan dan dibutuhkan kemudian menolak/membuang semua paket.
B. Accept some, drop all
Firewalls allow/accept some packages they want and need then reject/discard all packets.
D. Langkah-langkah
D. Steps
Non-aktifkan LAN dan Wireless Network Connection di Control Panel>Network and Internet>Network Connections pada PC/Laptop.
Disable LAN and Wireless Network Connection in the Control Panel->Network and Internet-> Network Connections on your PC/Notebook.
.png)
Buka VirtualBox, ubah network di VirtualBox dengan klik "Network".
Open VirtualBox, change the network in VirtualBox with click "Network".

Ubah network menjadi "Host-Only Adapter" lalu klik "OK".
Change the network into a "Host-Only Adapter" and click "OK".
Change the network into a "Host-Only Adapter" and click "OK".

Jalankan MikroTik di VirtualBox dengan klik "Start".
MikroTik run in VirtualBox by clicking "Start".
MikroTik run in VirtualBox by clicking "Start".

Login sebagai admin dan password kosong lalu "Enter".
Login as admin and the password is empty then "Enter".
Login as admin and the password is empty then "Enter".


Buka WinBox, akses via MAC Address.
Open WinBox, access via MAC Address.

Login sebagai admin dan password kosong lalu klik "Connect".
Login as admin and the password is empty then "Enter".

A. Teknik accept some, drop all
A. Techniques accept some, drop all
Saya konfigurasi Firewall Filter membuka port 53 (DNS) dan menutup semua port.
I configure the Firewall Filters open port 53 (DNS) and close all ports.
- Via CLI
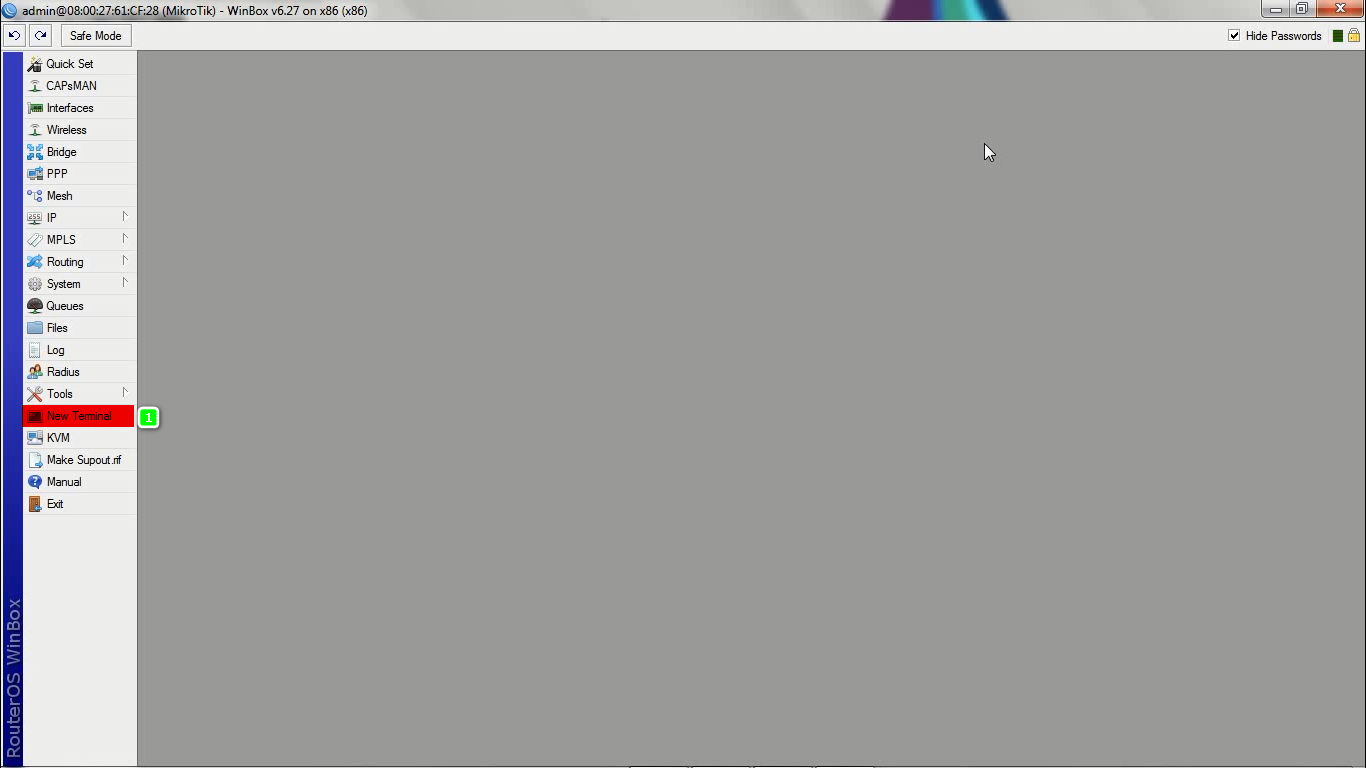
Pilih "New Terminal".
Select "New Terminal".

Ketik perintah untuk rule pertama "ip firewall filter add chain=input in-interface=ether1 protocol=tcp dst-port=53 action=accept" dan untuk melihat hasilnya ketik perintah "ip firewall print".
Type the command to the first rule "ip firewall filter add chain=input in-interface=ether1 protocol=tcp dst-port=53 action=accept" and to see the results type the command "ip firewall print".

Ketik perintah untuk rule kedua "ip firewall filter add chain=input in-interface=ether1 protocol=tcp action=accept" dan untuk melihat hasilnya ketik perintah "ip firewall print".
Type the command to the second rule "ip firewall filter add chain=input in-interface=ether1 protocol=tcp action=accept" and to see the results type the command "ip firewall print".

- Via GUI
Pilih "IP" lalu "Firewall".
Select "IP" and "Firewall".

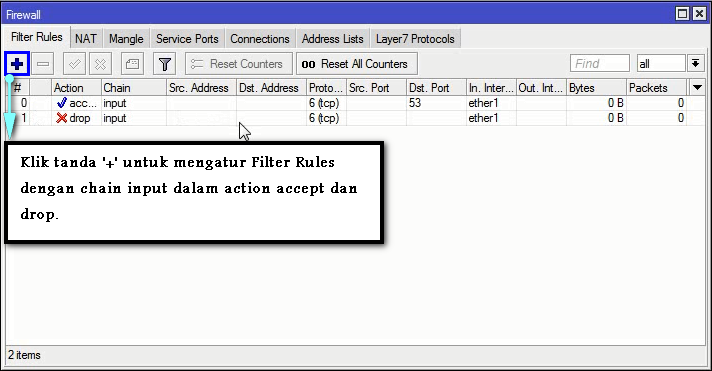
Karena sudah dikonfigurasi via CLI, terlihat 2 Filter Rules yang sudah dibuat.
Because it is configured via CLI, looks Filter Rules that have been made.

Untuk konfigurasi via GUI, klik tanda "+" untuk mengatur Filter Rules dengan chain input dalam action accept dan drop.
For configuration via the GUI, click the "+" to set the Filter Rules with the input chain accept and drop action.
For configuration via the GUI, click the "+" to set the Filter Rules with the input chain accept and drop action.
Untuk rule pertama pada tab "General", atur chain menjadi "input", protocol menjadi "6 (tcp)", dst.port menjadi "53", in-interface menjadi "ether1".
For the first rule in the "General" tab, set the chain into the "input", protocol into the "6 (tcp)", dst.port into the "53", in-interface into the "ether1".
For the first rule in the "General" tab, set the chain into the "input", protocol into the "6 (tcp)", dst.port into the "53", in-interface into the "ether1".

Pada tab "Action", atur action menjadi "accept" lalu "Apply" dan "OK".
On the tab "Action", set the action to be "accept" and "Apply" and "OK".
On the tab "Action", set the action to be "accept" and "Apply" and "OK".

Untuk rule kedua pada tab "General", atur chain menjadi "input", protocol menjadi "6 (tcp)", in-interface menjadi "ether1".
For the second rule in the "General" tab, set the chain into the "input", protocol into the "6 (TCP)",in-interface into the "ether1".

Pada tab "Action", atur action menjadi "drop" lalu "Apply" dan "OK".
On the tab "Action", set the action to be "drop" and "Apply" and "OK".
On the tab "Action", set the action to be "drop" and "Apply" and "OK".

Pilih "IP" lalu "Addresses" untuk mengatur IP Address ether1.
Select "IP" and "Addresses" to set the IP Address ether1.
Select "IP" and "Addresses" to set the IP Address ether1.

Klik tanda "+".
Click the "+".
Click the "+".

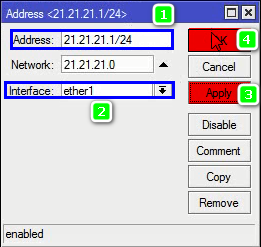
Ketik IP yang digunakan dan pilih interface "ether1", saya menggunakan IP Address "21.21.21.1/24". Klik "Apply" dan "OK".
Type the IP is used and select the interface "ether1", I use the IP Address "21.21.21.1/24". Click "Apply" and "OK".
Terlihat IP Address sudah terbuat dengan interface ether1.
Looks IP Address has been made with ether1 interface.
Looks IP Address has been made with ether1 interface.

Pilih "IP" lalu "DNS" untuk mengatur DNS.
Select "IP" and "DNS" to set the DNS.

Ketik DNS "8.8.8.8" centang "Allow Remote Requests", lalu klik "Apply" dan "OK".
DNS type "8.8.8.8" tick "Allow Remote Requests", then click "Apply" and "OK".

Atur IP Address di PC/Laptop, masukkan gateway yang sudah dibuat di MikroTik pada IP Addres dan DNS.
Set the IP address in the PC/Notebook, enter the gateway that has been made in MikroTik on IP Address and DNS.
Set the IP address in the PC/Notebook, enter the gateway that has been made in MikroTik on IP Address and DNS.

Buka Nmap, pada target masukkan IP Address ether1 lalu klik "Scan".
Open Nmap, on target ether1 enter the IP Address and click "Scan".
Open Nmap, on target ether1 enter the IP Address and click "Scan".

Terlihat port yang terbuka hanya port 53 yaitu DNS.
Look ports are open only port 53 is DNS.

Selanjutnya saya konfigurasi untuk membuka semua port tetapi hanya IP admin saja yang bisa mengakses semua port tersebut.
Next I configuration to open all ports but only the IP admin who can access all the ports.
- Via CLI
Pilih "New Terminal".
Select "New Terminal".
Ketikan perintah "ip firewall add chain=input in-interface=ether1 protocol=tcp src-address=21.21.21.21 action=accept" dan untuk melihat hasilnya ketik perintah "ip firewall print".
Typing the command "ip firewall add chain=input in-interface=ether1 protocol=tcp src-address=21.21.21.21 action=accept" and to see the results type the command "ip firewall print".

Pindahkan rule ke paling atas dengan ketik perintah "ip firewall filter move 2 0" dan untuk melihat hasilnya ketik perintah "ip firewall print". Terlihat sudah pindah ke rule paling atas.
Move to the top of the rule by typing the command "ip firewall filter move 2 0" and to see the results type the command "ip firewall print". Looks already moved to the top of the rule.

- Via GUI
Pilih "IP" lalu "Firewall".

Karena sudah dikonfigurasi via CLI, terlihat Filter Rules yang sudah dibuat.
Because it is configured via CLI, look Filter Rules that have been made.

Untuk konfigurasi via GUI, klik tanda "+" untuk mengatur Filter Rules dengan chain input dalam action accept untuk IP Address admin.
For configuration via the GUI, click the "+" to set the Filter Rules with the input chain in action accept to IP Address admin.

Pada tab "General", atur chain menjadi "input", protocol menjadi "6 (tcp)", in-interface menjadi "ether1".
On the "General" tab, set the chain into the "input", protocol becomes "6 (TCP)", in-interface becomes "ether1".

Pada tab "Action", atur action menjadi "accept" lalu "Apply" dan "OK".
On the tab "Action", set the action to be "accept" and "Apply" and "OK".

Ubah IP Address di PC/Laptop menjadi IP admin untuk mengaksesnya.
Change IP Address on your PC/Notebook into IP admin to access it.

Open Nmap, on target ether1 enter the IP Address and click "Scan".

Terlihat semua port terbuka, karena sudah dikonfigurasi bahwa IP admin yang bisa mengakses semua port.
Seen all the ports open, because it is configured that the IP admin can access all ports.

Saya ubah IP Address pada PC/Laptop dengan IP Address lain untuk mengecek port.
I change the IP address of the PC/Notebook with another IP address to check the port.

Open Nmap, on target ether1 enter the IP Address and click "Scan".

Terlihat yang terbuka hanya port 53 (DNS), karena hanya IP admin saja yang bisa mengakses semua port.
Looks only open port 53 (DNS), because only IP admin who can access all ports.

B. Teknik drop some, accept all
A. Techniques drop some, accept all
Jika menggunakan teknik drop some, accept all, ubah kembali menjadi IP admin.
If using some drop technique, accept all, change back into IP admin.

Pilih "IP" lalu "Firewall".
Select "IP" and "Firewall".

Hapus semua Filter Rules yang sudah dikonfigurasi sebelumnya. Klik tanda "-" untuk menghapus.
Remove all Filter Rules that has been previously configured. Click the "-" to remove.

Terlihat sudah terhapus konfigurasi sebelumnya di Filter Rules.
Looks already erased the previous configuration in the Filter Rules.

- Via CLI
Pilih "New Terminal".
Select "New Terminal".

Pertama buat dahulu Firewall Filter untuk ether1 dengan memasukkan port yang diperbolehkan dan tidak diperbolehkan. Tulis semua port, kecuali port 53 (DNS) agar hanya mengakses port 53 saja, yaitu DNS. Pada IP Address tulis IP Address 21.21.21.22-21.21.21.255, karena 21.21.21.21 merupakan IP admin yang dikonfigurasikan untuk mengakses semua port. Ketik perintah "ip firewall filter add chain=input in-interface=ether1 protocol=tcp dst-port=21,23,80,22,2000,8291 src-address=21.21.21.22-21.21.21.255 action=drop" dan untuk melihat hasilnya ketik perintah "ip firewall print".
First make advance Firewall Filters to ether1 by entering the port is allowed and not allowed. Write all ports except port 53 (DNS) so that only the access port 53 only, ie DNS. In the IP Address IP Address 21.21.21.22-21.21.21.255 write, because admin IP 21.21.21.21 is configured to access all ports. Type the command "ip firewall filter add chain=input in-interface=ether1 protocol=tcp dst-port=21,23,80,22,2000,8291 src-address=21.21.21.22-21.21.21.255 action=drop" and to see the results type the command "ip firewall print".
Buat rule memperbolehkan port 53 (DNS) dan IP admin (21.21.21.21), ketik perintah "ip firewall filter add chain=input in-interface=ether1 protocol=tcp action accept" dan untuk melihat hasilnya ketik perintah "ip firewall print".
Create a rule to allow port 53 (DNS) and IP admin (21.21.21.21), type the command "ip firewall filter add chain=input in-interface=ether1 protocol=tcp action accept"" and to see the results type the command "ip firewall print".
- Via GUI
Pilih "IP" lalu "Firewall".
Select "IP" and "Firewall".

Karena sudah dikonfigurasi via CLI, terlihat 2 Filter Rules yang sudah dibuat.
Because it is configured via CLI, seen 2 Filter Rules that have been made.
.png)
Untuk konfigurasi via GUI, klik tanda "+" untuk mengatur Filter Rules dengan chain input dalam action drop dan accept.
For configuration via the GUI, click the "+" to set the Filter Rules with the input chain and accept drop action.
.png)
Untuk rule pertama pada tab "General", atur chain menjadi "input", src-address menjadi "21.21.21.22-21.21.21.255" protocol menjadi "6 (tcp)", dst.port menjadi "21,23,80,22,2000,8291", in-interface menjadi "ether1".
For the first rule in the "General" tab, set the chain into the "input", src-address into the "21.21.21.22-21.21.21.255" protocol into "6 (TCP)", dst.port into the "21,23,80,22 , 2000.8291 ", in-interface into the " ether1 ".

Pada tab "Action", atur action menjadi "drop" lalu "Apply" dan "OK".
On the tab "Action", set the action to be "drop" and "Apply" and "OK".

Untuk rule kedua pada tab "General", atur chain menjadi "input", protocol menjadi "6 (tcp)", in-interface menjadi "ether1".
For the second rule in the "General" tab, set the chain into the "input", protocol into the "6 (TCP)", in-interface into the "ether1".

Pada tab "Action", atur action menjadi "accept" lalu "Apply" dan "OK".
On the tab "Action", set the action to be "accept" and "Apply" and "OK".

Buka Nmap, pada target masukkan IP Address ether1 lalu klik "Scan".
Open Nmap, on target ether1 enter the IP Address and click "Scan".

Terlihat semua port terbuka, karena menggunakan IP admin (21.21.21.21) pada PC/Laptop.
Looks all open ports, because it uses the admin IP (21.21.21.21) on your PC/Notebook.

Change the IP Address of thePC/Notebook using another IP Address.

Open Nmap, on target ether1 enter the IP Address and click "Scan".

Terlihat port yang terbuka hanya port 53 yaitu DNS. Karena hanya IP admin saja yang bisa mengakses semua port.
Look ports are open only port 53 is DNS. Since only the IP admin who can access all ports.

- Video Tutorial
Semoga Bermanfaat.
Hope It Is Useful.
Hope It Is Useful.
Terima Kasih.
Thank You.
Thank You.
Wassalamu'alaikum.wr.wb.

0 komentar:
Post a Comment