


Assalamu'alaikum.wr.wb.
Disini saya akan posting laporan saya mengenai reset konfigurasi, menambahkan package (user-manager), hidup dan matikan IPv6, menaikkan dan menurunkan versi, dan install ulang di RouterBoard MikroTik.
Here I will posting my report on the reset configuration, add the package (user-manager), enable and disable IPv6, upgrade and downgrade versions, and netinstall in RouterBoard MikroTik.
Here I will posting my report on the reset configuration, add the package (user-manager), enable and disable IPv6, upgrade and downgrade versions, and netinstall in RouterBoard MikroTik.
A. Tujuan
A. Purpose
- Dapat mengetahui cara reset konfigurasi, menambahkan package (user-manager), nyalakan dan matikan IPv6, menaikkan dan menurunkan versi, dan install ulang di RouterBoard MikroTik.
- Can knows how to reset the configuration, add the package (user-manager), enable and disable IPv6, upgrade and downgrade versions, and netinstall in RouterBoard MikroTik.
B. Perlengkapan
B. Materials
- 1 Unit PC/Notebook
- RouterBoard series R951G-2HnD
- Kabel UTP
- Kabel Power RouterBoard
- 1 Unit PC/Notebook
- RouterBoard series R951G-2HnD
- Cable UTP
- Cable Power RouterBoard
- 1 Unit PC/Notebook
- RouterBoard series R951G-2HnD
- Cable UTP
- Cable Power RouterBoard
C. Langkah Kerja
C. Steps
Matikan terlebih dahulu 'VirtualBox Host-Only Network' dan 'Wireless Network Connection'.
Disable the first 'VirtualBox Host-Only Network' and 'Wireless Network Connection'.

Colokkan Kabel UTP di port 2 (Ethernet) pada RouterBoard beserta kabel power, kemudian colokkan kabel UTP ke PC/Notebook,
Plug UTP cable in port 2 (Ethernet) on RouterBoard along with power cable, then plug the UTP cable to the PC/Notebook.

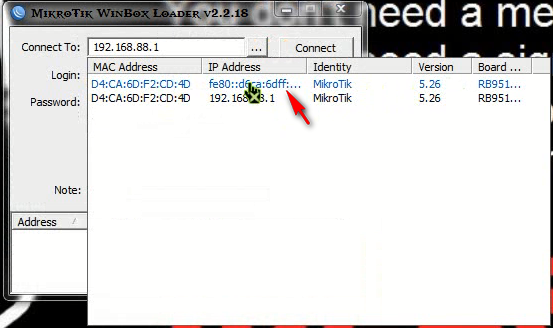
Klik '...', Masuk menggunakan IP Address, lalu klik 'Connect'. Login sebagai (admin) dan password (kosong).
Click '...', Sign in using IP Address, then click 'Connect'. Login as (admin) and password (empty) press 'Enter'.

Apabila ingin menggunakan user dan password, dapat menulis di terminal dengan 'user add name=(nama user) group=(write/read/full)' dan 'user set password=(tulis passwordnya) numbers=(1)'.
If you want to use a username and password, can write in the terminal with the 'user add name = (user name) group = (write / read / full)' and 'user set password = (write password) numbers = (1)'.

Buka WinBox, masukkan user dan passwordnya yang sudah dibuat pada 'Login' dan 'Password' dan klik 'Connect'. Maka akan berubah nama 'Admin' menjadi nama usernya.
Open WinBox, enter the username and password that have been made on the 'Login' and 'Password' and click 'Connect'. It will change the name of 'admin' into the name of the user.


Here I use the default IP address of MikroTik ie '192.168.88.1'. Set the IP address on the client.

Matikan Windows Firewall di 'Control Panel->System and Security->Windows Firewall->Customize Settings'.
Turn off Windows Firewall in the 'Control Panel-> System and Security-> Windows Firewall-> Customize Settings'.

Ping dari client ke IP Address MikroTik.
Ping the IP address of the client to MikroTik.

Ping juga dari server ke IP Address client.
Ping the IP address of the server to the client.

- Reset Konfigurasi
- Reset Configuration
- Reset Configuration
Colokkan Kabel UTP di port 2 (Ethernet) pada RouterBoard beserta kabel power, kemudian colokkan kabel UTP ke PC/Notebook,
Plug UTP cable in port 2 (Ethernet) on RouterBoard along with power cable, then plug the UTP cable to the PC/Notebook.
Klik '...', Masuk menggunakan IP Address, lalu klik 'Connect'. Login sebagai (admin) dan password (kosong).
Click '...', Sign in using IP Address, then click 'Connect'. Login as (admin) and password (empty) press 'Enter'.

Pilih 'System-Reset Configuration'. Klik 'Reset Configuration'.
Select 'System-Reset Configuration'. Click 'Reset Configuration'.

Klik 'Yes' untuk mereset konfigurasi dan restart RouterBoard MikroTiknya.
Click 'Yes' to reset the configuration and restart the Mikrotik RouterBoard.

Klik 'OK' pada 'Router has been disconnected'.
Click 'OK' in the 'Router has been disconnected'.

Karena tidak centang 'No Default Configuration' maka akan terlihat IP Address sudah ada. Masuk menggunakan IP Address dan klik 'Connect'.
Because it does not tick the 'No Default Configuration' it will show the IP address already exists. Sign in using IP Address and click 'Connect'.
Klik 'OK'. Reset Konfigurasi sudah berhasil.
Click 'OK'. Reset configuration was successful.

- Catatan / Perbedaan Reset Konfigurasi
- Notes / Reset Configuration Differences
1. Centang 'No Default Configuration'.
1. Tick 'No Default Configuration'.
Apabila mencentang 'No Default Configuration', maka akan mereset semua konfigurasi RouterBoard. Biasanya tidak terdapat IP Addressnya.
If the tick 'No Default Configuration', then it will reset all configuration RouterBoard. Usually there are no IP Addressnya.


2. Tidak Centang 'No Default Configuration'.
2. Not Tick 'No Default Configuration'.
Apabila tidak mencentang 'No Default Configuration', maka akan mereset semua konfigurasi RouterBoard pada saat kita membelinya. Biasanya terdapat IP Address defaultnya yaitu '192.168.88.1'.
If not tick 'No Default Configuration', then it will reset all configuration RouterBoard at the time we bought it. Usually there is a default setting of IP Address '192.168.88.1'.

- Menambahkan Package (user-manager).
- Adding Package (user-manager).
Copy file 'user-manager-5.26.mipsbe.npk' dari client, disini saya menggunakan versi 5.26. Apabila belum punya filenya kalian bisa mendownload di http://mikrotik.co.id/ atau http://www.routeros.co.id/. Download sesuai dengan versinya.
Copy the file 'user-manager-5.26.mipsbe.npk' of the client, here I am using version 5.26. If you do not have the file can be downloaded at http://mikrotik.co.id/ or http://www.routeros.co.id/. Download appropriate with it's version.

Pilih 'File' kemudian paste pada icon gambar di bawah ini. Tunggu proses hingga selesai.
Select 'File' then paste on the icon image below. Wait until the process is complete.

Setelah selesai akan muncul file 'user-manager.npk' seperti gambar di bawah ini dan berhasil.
Once completed will show the file 'user-manager.npk' as shown below and succeed.

- Hidup dan Matikan IPv6
- Enable and Disable IPv6
Pilih 'System->Packages', kemudian klik 'Enable' IPv6.
Select 'System> Packages', then click 'Enable' IPv6.


Restart WinBoxnya, pilih 'System-Reboot' dan pilih 'Yes'.
Restart WinBox, select 'System-Reboot' and select 'Yes'.


Centang untuk hidupkan IPv6 pada client.
Tick to turn on IPv6 on the client.

Buka WinBox, klik '...', pilih IPv6 seperti pada gambar di bawah ini.
Open WinBox, click '...', select IPv6 as in the picture below.
Login sebagai admin, kemudian klik 'Connect'.
Login as admin, then click 'Connect'.

Maka akan berubah menjadi IPv6 pada WinBox.
Then it will change into IPv6 on WinBox.

Untuk matikan IPv6, Pilih 'System->Packages', kemudian klik 'Disable' IPv6.
To disable IPv6, select 'System> Packages', then click 'Disable' IPv6.

Restart WinBoxnya, pilih 'System-Reboot' dan pilih 'Yes'.
Restart WinBox, select 'System-Reboot' and select 'Yes'.
Centang kembali untuk matikan juga IPv6 pada client.
Tick back to turn off IPv6 on the client also.

Buka WinBox, klik '...', maka tidak ada IPv6 karena sudah di matikan dan berhasil.
Open WinBox, click '...', then there is no IPv6 because it has been disable and succeed.

Login kembali menggunakan IPv4, masukkan user dan passwordnya yang sudah dibuat pada 'Login' dan 'Password' dan klik 'Connect'.
Log back in using IPv4, enter the username and password that have been made on the 'Login' and 'Password' and click 'Connect'.
- Menaikkan dan Menurunkan Versi
- Upgrade and Downgrade Version
Karena versi saya 5.26, saya ingin menaikkan versi ke 6.25. Copy files 'routeros-mipsbe-6.25.npk' dari client. Apabila belum punya filenya 'routerOS' kalian bisa mendownload di http://mikrotik.com/ atau http://www.routeros.co.id/.
Because my version 5.26, I would like to upgrade the version to 6:25. Copy files 'routeros-mipsbe-6.25.npk' of the client. If you have not got the file 'RouterOS' you can download at http://mikrotik.com/ or http://www.routeros.co.id/.

Pilih 'File' kemudian paste pada icon gambar di bawah ini. Tunggu proses hingga selesai.
Select 'File' then paste on the icon image below. Wait until the process is complete.
Setelah selesai akan muncul file 'routeros-mipsbe-6.25.npk' seperti gambar di bawah ini.
After completion of the file will appear 'routeros-mipsbe-6.25.npk' as show below.

Restart WinBoxnya, pilih 'System-Reboot' dan pilih 'Yes'.
Restart WinBox, select 'System-Reboot' and select 'Yes'.
Buka WinBox, klik '...' maka sudah berhasil menaikkan versi dari versi sebelumnya.
Open WinBox, click '...' it has succeeded upgrade in the version of the previous version.

Login kembali, masukkan user dan passwordnya yang sudah dibuat pada 'Login' dan 'Password' dan klik 'Connect'.
Login back, enter the username and password that have been made on the 'Login' and 'Password' and click 'Connect'.
Pilih 'Log' lihat sudah terinstall dan terverifikasi versi terbarunya. Berhasil.
Select 'Log' view has been installed and verified the latest version. Success.

Untuk menurunkan versinya. Copy files 'routeros-mipsbe-5.26.npk' dari client. Apabila belum punya filenya 'routerOS' kalian bisa mendownload di http://mikrotik.com/ atau http://www.routeros.co.id/.
To downgrade version. Copy files 'routeros-mipsbe-5.26.npk' of the client. If you have not got the file 'RouterOS' you can download at http://mikrotik.com/ or http://www.routeros.co.id/.

Pilih 'File' kemudian paste pada icon gambar di bawah ini. Tunggu proses hingga selesai.
Select 'File' then paste on the icon image below. Wait until the process is complete.

Setelah selesai akan muncul file 'routeros-mispsbe-5.26.npk' seperti gambar di bawah ini.
After completion of the file will appear 'routeros-mipsbe-5.26.npk' as show below.

Pilih 'System->Packages', kemudian klik 'Downgrade'.
Select 'System> Packages', then click 'Downgrade'.


Click 'Yes' to downgrade and restart.

Buka WinBox, klik '...' maka sudah berhasil menurunkan versinya.
Open WinBox, click '...' it has succed to downgrade it's version.

Login kembali, masukkan user dan passwordnya yang sudah dibuat pada 'Login' dan 'Password' dan klik 'Connect'.
Login back, enter the username and password that have been made on the 'Login' and 'Password' and click 'Connect'.
Pilih 'Log' lihat sudah terinstall dan terverifikasi versinya. Berhasil.
Select 'Log' view has been installed and verified version. Success.
\

- Install Ulang
- Net Install
Buka WinBox dengan 'Run Administrator'.
Open WinBox with 'Run Administrator'.

Login kembali, masukkan user dan passwordnya yang sudah dibuat pada 'Login' dan 'Password' dan klik 'Connect'.
Login back, enter the username and password that have been made on the 'Login' and 'Password' and click 'Connect'.
Pilih 'System->RouterBoard'. Klik 'Settings'.
Select "System-> RouterBoard '. Click 'Settings'.


Pilih Boot Devicenya menjadi 'try-ethernet'. Klik 'Apply' dan 'OK.
Select Boot devicenya be 'try-ethernet'. Click 'Apply' and 'OK.

Klik 'OK'.
Klik 'OK'.

Karena saya ingin install ulang RouterBoard versi 6.25. Bikin folder tersendiri yang di dalamnya terdapat 'routeros-mipsbe-6.25.npk'.
Because I want to netinstall RouterBoard 6.25 version. Create a folder in which there are 'routeros-mipsbe-6.25.npk'.


Buka 'netinstall.exe' dengan Run Administrator. Apabila belum punya filenya 'netinstall' kalian bisa mendownload di http://mikrotik.com/ atau http://www.routeros.co.id/.
Open 'netinstall.exe' with Run Administrator. If you have not the file 'NetInstall' you can download at http://mikrotik.com/ or http://www.routeros.co.id/.

Pilih 'Net booting'. Karena di client memasukkan IP Address '192.168.88.2', maka di netinstall saya memasukkan IP Address '192.168.88.3'.
Select the 'Net booting'. Because the client write the IP Address '192.168.88.2', then in the NetInstall I write the IP Address '192.168.88.3'.


Klik 'Browse' untuk mencari folder 'routeros-mipsbe-6.25.npk' yang sudah dibuat sebelumnya.
Click 'Browse' to find the folder 'routeros-mipsbe-6.25.npk' that have been made previously.


Apabila tidak terdeteksi RouterBoardnya pada netinstall, lakukan prosedur gambar dibawah ini:
If not detected RouterBoardnya on NetInstall, do the procedure shown below:
- Lepas atau copot kabel UTP di Port 2 (Ethernet) pada RouterBoard.
- Unplug the UTP cable at Port 2 (Ethernet) on RouterBoard.


- Pindahkan dan colokkan kabel UTP ke Port 1 (PoE) pada RouterBoard.
- Move the UTP cable and plug it into Port 1 (PoE) on RouterBoard.

- Lepaskan atau copot kabel power pada RouterBoard.
- Unplug the cable power to the RouterBoard.

- Colokkan kembali kabel power pada RouterBoard.
- Plug again or back the cabel power in RouterBoard.

Maka akan terdeteksi RouterBoardnya. Centang 'routeros-mipsbe-6.25.npk' dan klik 'Install', tunggu proses hingga selesai.
It will be detected RouterBoardnya. Tick 'routeros-mipsbe-6.25.npk' and click 'Install', wait until the process is complete.

Apabila sudah selesai, maka akan ada status 'OK'.
When finished, it will have the status of 'OK'.

Buka WinBox, maka install ulang RouterBoard sudah berhasil.
Open WinBox, then netinstall the RouterBoard already succeeded.

Login sebagai admin dan password kosong klik 'Connect'.
Login as admin and empty password click 'Connect'.


- Video Tutorial
Semoga Bermanfaat.
Hope It Is Useful.
Hope It Is Useful.
Terima Kasih.
Thank You.
Thank You.
Wassalamu'alaikum.wr.wb.

0 komentar:
Post a Comment